Web sites these days go viral within no time and such applications need to be prepared for both the extremes, worst and the best. In this blog, I’m going to talk about how Network Load Balancer prepares your application for all kinds of traffic.
Topics that I’m going to cover in this blog:
- What Is Elastic Load Balancer?
- Types Of Elastic Load Balancer
- Network Load Balancer
- Features Of Network Load Balancer
- Demo to Create and Demonstrate the Working Of Network Load Balancer
What Is Elastic Load Balancer?
Before getting into what is Elastic Load Balancer, let’s first understand the concept of Load balancing with a scenario based example. You enter a retail store, pick up things you need to buy and approach the billing counters. You see, there are 3 counters that are open and all 3 of them has a very long queue. The store manager sees you and other customers getting annoyed. He decides to open the other two counters. Now the load on those three counters gets reduced and eventually divided amongst the five counters. This makes the customers happy and reduces the cashier’s workload. This is the concept of load balancing.

Load balancing is efficiently distributing the incoming traffic across a group of backend servers. Amazon provides it’s very own service for load balancing called Elastic Load Balancer.
Types of Elastic Load Balancers
There are three main types of Load Balancers provided by AWS. You can choose the one best suited for your requirement.
Classic Load Balancer(CLB)
This is the most basic form of Load Balancer which distributes incoming traffic between various EC2 instances in different Availability Zones. This increases the fault tolerance of your application that is deployed on the EC2 instances. You can always add and remove instances from the load balancers as and when needed. Elastic Load Balancer scales the load balancer according to the incoming traffic(dynamically).
Application Load Balancer(ALB)
An application Load Balancer functions at the Application Layer of the OSI model, which is the seventh layer. You add listeners to your load balancers. Listener basically checks for connection requests from the clients and routes based on the rules you’ve defined. Rules consist of conditions, priority and target group. So basically when the listener finds a client connection, it checks for the defined condition and priority and routes the traffic to the target groups.
Have a look at this blog which explains Application Load Balancer with a demonstration of how it works, to give you a better idea.
Network Load Balancer(NLB)
Network Load Balancer functions on the fourth layer of the OSI Model, i.e, the Transport Layer. It’s capable of handling millions of client requests per second. It is best suited for treating volatile incoming traffic. It gives very low latency and hence considered to be one the best and most efficient Elastic Load Balancers.
Network Load Balancer
As I’ve mentioned earlier, Network Load Balancer functions on the fourth layer of the OSI Model. It can handle millions of client requests per second. It’s considered to be the best and most efficient Load Balancer provided by AWS.
Just like Application Load Balancer, Network Load Balancer also consists of listeners, that listens to the client connection requests. This Listener configuration specifies the port and protocol for making the front-end connections(Client to Network Load Balancer) as well as the back-end connections(Network Load Balancer to instances). Once the connection request is received, Network Load Balancer analyzes the rules defined by the user and picks a target group to route the client request. The Network Load Balancer opens a TCP connection to the selected target by opening the port specified in listener configuration.
You have an option to enable Availability Zone for your Network Load Balancer. When you do that, Elastic Load Balancer creates a Load Balancer Node in that particular Availability Zone. Each Load Balancer Node distributes traffic in that particular Availability Zone. If you enable multiple Availability Zones for your Network Load Balancer, each Load Balancer Node distributes traffic across the registered targets in multiple Availability Zones. This is called Cross Zone Load Balancer.
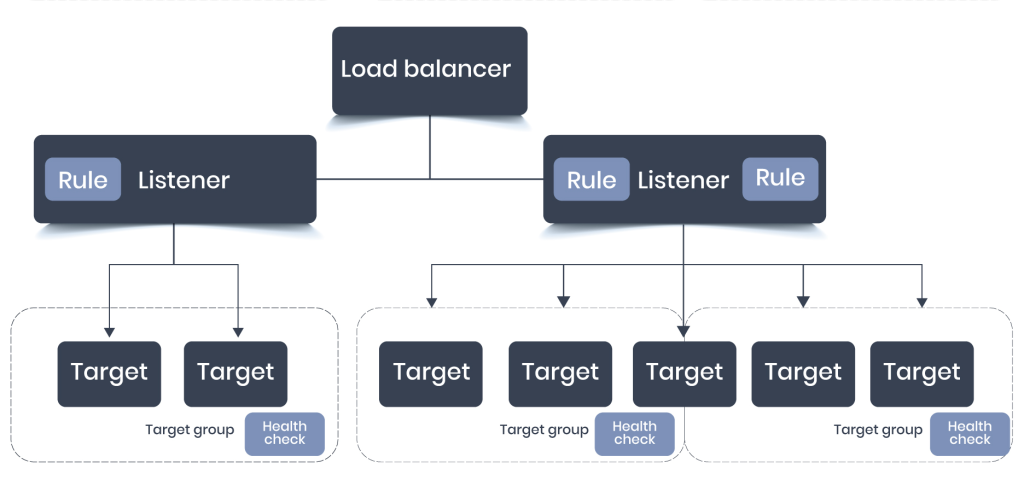
Network Load Balancer selects target using the Hash Algorithm. This algorithm is based on the protocol, Source IP, Source Port, Destination IP, Destination port, TCP sequence number. So basically, your Network Load Balancer creates a Network Interface for each Availability Zone that you’ve enabled and each Load Balancer Node in that Availability Zone uses this Network Interface to get the static IP address.
Features Of Network Load Balancer
Connection based Load Balancing – Load Balancing of TCP traffic to targets like EC2 instances, microservices, containers, and IP addresses.
High Availability – If an unhealthy target is detected, then it stops routing to that unhealthy target and starts routing to the healthy target in the same or different Availability Zone based on the enabled Availability Zone.
High Throughput – Can handle sudden volatile traffic patterns.
Low Latency – Offers very low latency for applications whose performance depends on latency.
Preserves Source IP Address – Preserves client side IP address.
Static IP Support – Automatically provides a static IP per availability zone. This static IP can be used as the front-end IP of the load balancer by the deployed applications.
Elastic IP Support – Along with providing static IP, it also provides an option to assign an Elastic IP per Availability Zone.
Health Checks – Supports both application and network target health checks.
DNS Fail-Over – Network Load Balancer is integrated with Route53 and hence if it encounters any unhealthy targets, it re-routes the traffic to other healthy targets.
Integration with AWS Services – Network Load Balancer is integrated with other AWS services like AutoScaling, EC2 instances, CloudFormation, CodeDeploy, etc.
Demo to Create and Demonstrate the Working Of Network Load Balancer
Let’s understand the working of a Network Load balancer by creating it and demonstrating the routing of the traffic amongst different EC2 instances. I’m going to create two EC2 instances, deploy Nginx web server on both of them, one which says server1 and the other one says server2 so that we can differentiate between the two.
Let’s start with creating a Network Load Balancer.
Step 1: Create two EC2 instances and connect your EC2 instances with your either cmder or putty.
Step 2: Now that you’ve created the EC2 instances, let’s install Nginx web-servers on both of them.
Execute the following commands on both your instances to install Nginx:
| 1 2 3 4 5 | $ sudo apt-get update$ sudo apt install nginx$ sudo ufw app list$ sudo ufw allow 'Nginx HTTP'$ sudo ufw status |
This should give you an output of status showing active.
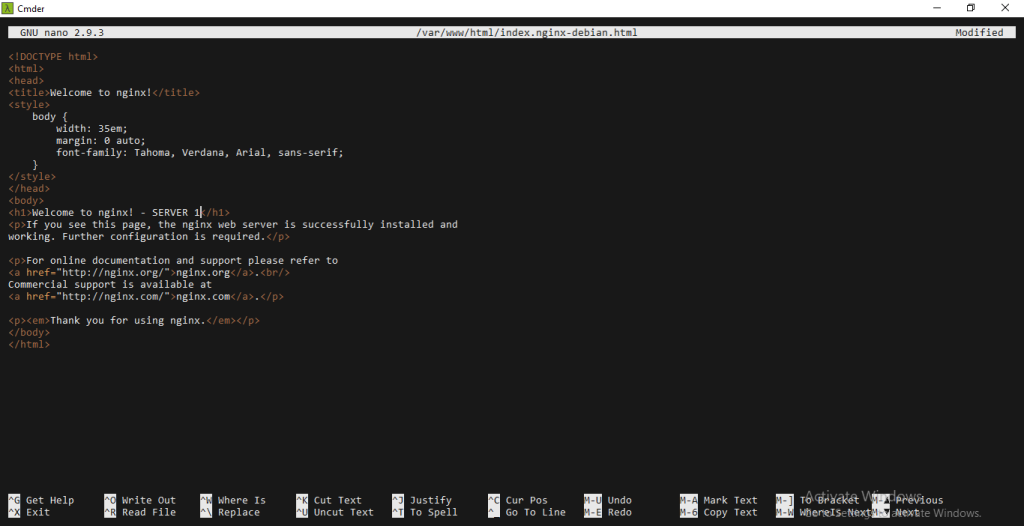
Step 3: Now when you visit the public IP of your instances you should see a page that says “Welcome to Nginx”. Since we need to differentiate between the two servers, let us change the display to “Welcome to Nginx – Server1” and on the other to “Welcome to Nginx – Server2”.
Go to the following directory:
| 1 2 | cd /var/www/htmlsudo vi index.nginx-debian.html |
Change the H1 tag from “Welcome to Nginx” to “Welcome to Nginx – Server1” on one instance and “Welcome to Nginx – Server2” on the other.
Step 4: Let’s finally create a Network Load Balancer.
In the navigation pane, under LOAD BALANCING, choose Load Balancers.
Choose Create Load Balancer.
On the Select Load Balancer type page, choose Create Network Load Balancer
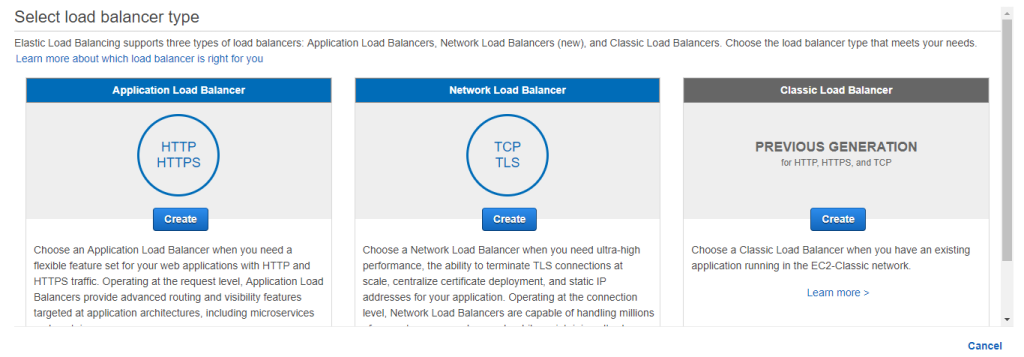
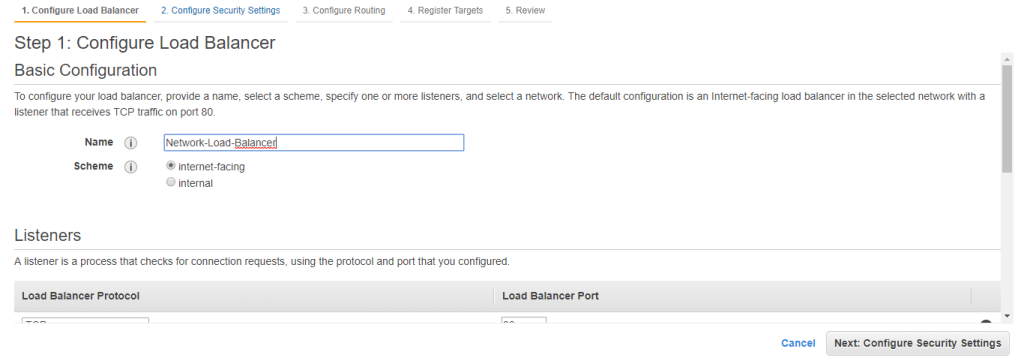
Let’s Configure the Load Balancer. For Name, type the name you would like your Load Balancer to have. For Scheme either select Internet-facing or Internal. In this case, I’ve chosen internet-facing. Internet-facing basically routes requests from clients to the target over the internet.
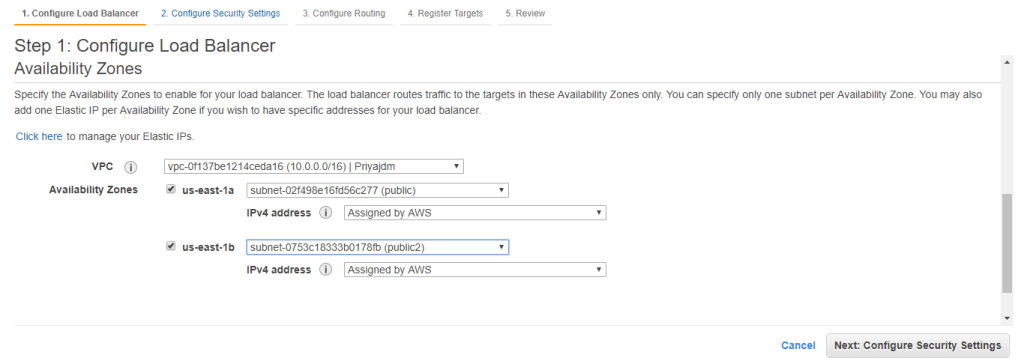
For configuring the Availability Zones, select the VPC that you’ve used to create your EC2 instances. If you’ve created your instances in different Availability Zones, then select those availability zones and subnet for that particular Availability Zones.
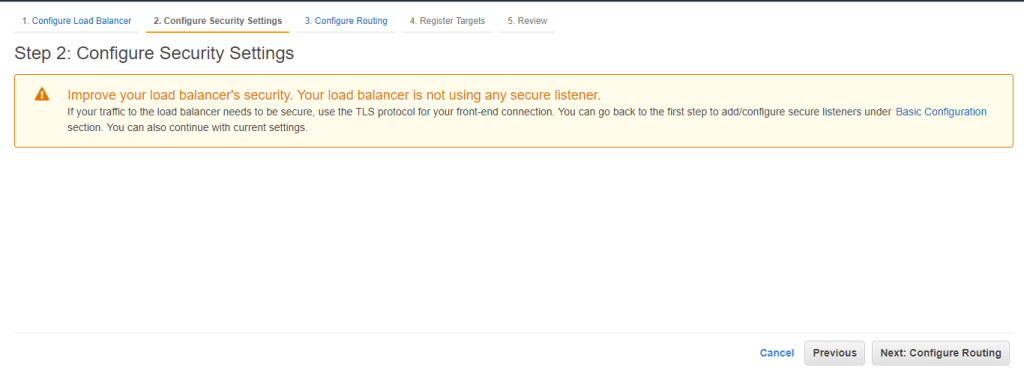
Select on Next: Configure Security Settings. You’ll see a warning as shown in the picture below. But it’s just a warning and you can ignore it.
For Target Group, keep the default setting New Target Group.
For Name, type in the name you would like your new Target Group to have.
Set Protocol and Port as required.
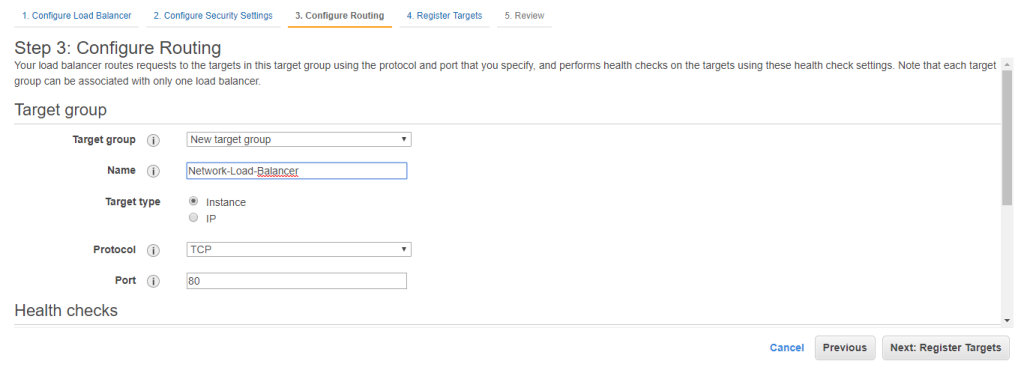
Leave the rest with the default settings.
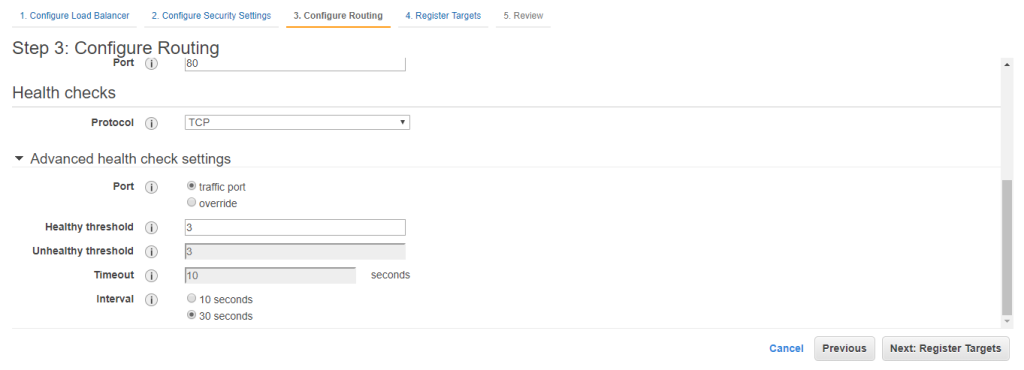
Click on Next: Register Targets.
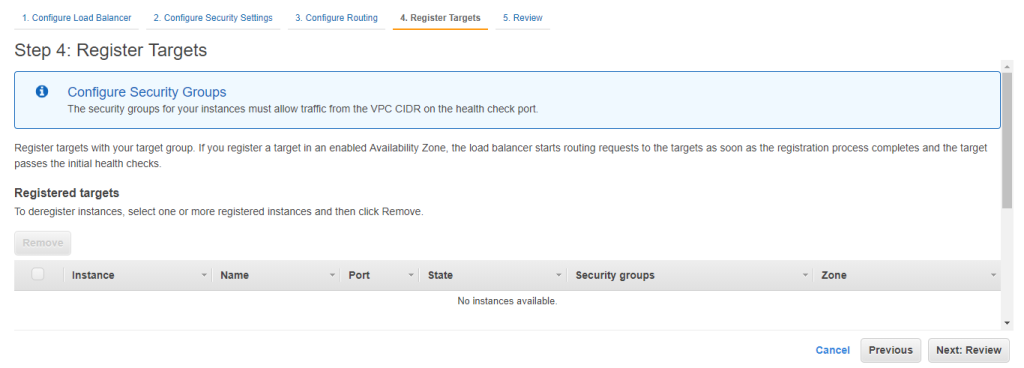
Register your instances with the target group and click on Next: Review. Review your Load Balancer and then finally click on Create.
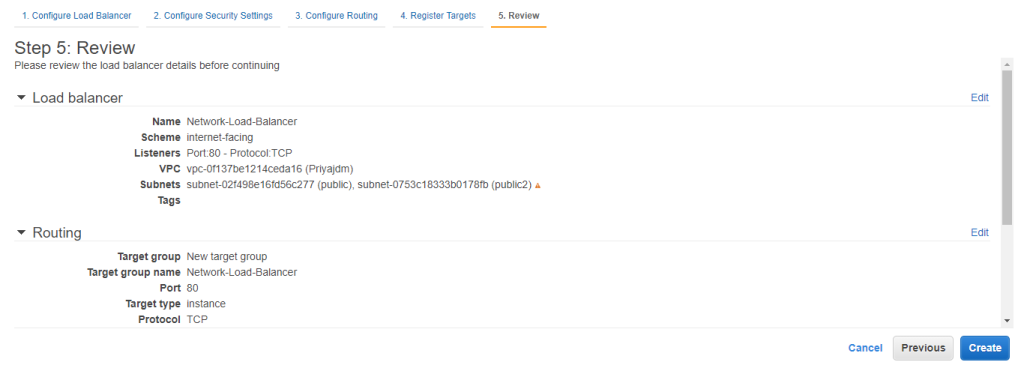
You’ll see that your Load Balancer is getting provisioned.

Give it a few minutes and you’ll see the status as active.

Now that you’ve created the Load Balancer, let’s test if it’s working fine. Copy your Load Balancer’s DNS Name and paste it on a search engine like a URL. You should see your first instances’ Nginx page.

Now you go to another browser and paste the same DNS name as a URL, it should show you the second instances’ deployment.

So now the load on both your EC2 instances will be handled by this Load Balancer. Another way to test the working of your Load Balancer is to shut one instance and check if its deployments are deployed on the Load Balancer’s DNS.
This brings us to the end of this Network Load Balancer blog. I hope you guys have understood the concept behind this amazing service provided by Amazon.
If you wish to learn more about Cloud Computing and build a career in Cloud Computing, then check out our Cloud Computing Courses which comes with instructor-led live training and real-life project experience. This training will help you understand Cloud Computing in depth and help you achieve mastery over the subject.
